How to Set Up a Basic 3-Point Lighting System sets the stage for this enthralling narrative, offering readers a glimpse into a story that is rich in detail with formal and friendly language style and brimming with originality from the outset.
Mastering the art of 3-point lighting is fundamental for anyone looking to elevate their visual content, whether for photography, videography, or stage production. This system, comprising a key light, fill light, and back light, is designed to sculpt your subject, create depth, and enhance the overall mood and professionalism of your shots. Understanding the purpose and placement of each light allows for precise control over shadows and highlights, transforming ordinary scenes into visually compelling narratives.
Understanding the Fundamentals of 3-Point Lighting
Welcome to the foundational module of our guide on setting up a basic 3-point lighting system. This system is a cornerstone of visual storytelling, providing a simple yet highly effective method to sculpt your subject with light, create depth, and evoke specific moods. Mastering these fundamentals will empower you to achieve professional-looking results in a variety of photographic and videographic contexts.At its core, 3-point lighting is an intuitive and versatile technique that utilizes three distinct light sources to illuminate a subject.
Each light plays a specific role, working in concert to define the subject’s form, separate it from the background, and add visual interest. This deliberate placement and control of light allow for a nuanced and controlled aesthetic, moving beyond flat or uninspired illumination.
The Three Essential Lights and Their Roles
A standard 3-point lighting setup comprises three key lights: the Key Light, the Fill Light, and the Back Light. Understanding the function of each is crucial for effectively shaping your subject and controlling the overall mood of your scene.
Key Light
The Key Light is the primary and most powerful light source in the setup. Its main purpose is to illuminate the subject, defining its shape and form. It is typically positioned at an angle to the subject, usually around 45 degrees to the side and slightly above eye level. This placement creates natural-looking shadows that reveal texture and dimension. The intensity of the Key Light dictates the overall brightness of the subject.
Fill Light
The Fill Light serves to soften the shadows cast by the Key Light. It is positioned on the opposite side of the camera from the Key Light, often at a lower intensity. Its primary purpose is to reduce contrast and add detail to the shadowed areas, preventing them from becoming completely black and losing information. The Fill Light doesn’t need to be as strong as the Key Light; its role is to subtly lift the shadows, not to eliminate them entirely.
Back Light
Also known as a rim light or hair light, the Back Light is positioned behind the subject and aimed towards the camera or the back of the subject’s head and shoulders. Its fundamental purpose is to create a separation between the subject and the background. By illuminating the edges of the subject, it adds a subtle glow or halo effect, making the subject pop and appear more three-dimensional.
This light is crucial for preventing the subject from appearing flat or “stuck” to the background.
Primary Purpose of Each Light in Shaping the Subject
The interplay between the Key, Fill, and Back lights is what truly shapes the subject. The Key Light defines the primary form and features. The Fill Light refines the dimensionality by controlling the depth of the shadows. The Back Light then adds a crucial layer of separation, giving the subject presence and presence within the frame. Together, they create a balanced and visually appealing representation of the subject.
Typical Light Ratios and Their Effects
Light ratios refer to the relative intensity of the Key Light compared to the Fill Light. These ratios are critical in determining the mood and aesthetic of your image.
- 1:1 Ratio (Flat Lighting): In this setup, the Key Light and Fill Light are at equal intensity. This results in very few shadows and a flat, even illumination. It’s often used for product photography or when a very clean, direct look is desired.
- 2:1 Ratio (Subtle Contrast): The Key Light is twice as bright as the Fill Light. This creates soft shadows with good detail in the illuminated areas. It’s a common and pleasing ratio for general portraiture and interviews, offering a natural look without excessive contrast.
- 4:1 Ratio (Moderate Contrast): The Key Light is four times as bright as the Fill Light. This produces more pronounced shadows, adding a sense of drama and depth. It’s often used for more dramatic portraits or when you want to emphasize texture and form.
- 8:1 Ratio (High Contrast): The Key Light is eight times brighter than the Fill Light. This creates deep, dark shadows with significant contrast. This ratio is typically used for film noir aesthetics, dramatic character studies, or when a strong, moody atmosphere is desired.
The Back Light’s intensity is usually set to create a subtle separation, often at a lower intensity than the Key Light, or sometimes at an equal intensity if a stronger rim effect is desired. The exact ratios can be adjusted based on the desired mood, the subject matter, and the surrounding environment.
“Light shapes, shadow defines.”
This adage perfectly encapsulates the purpose of a well-executed 3-point lighting system. By understanding and manipulating these fundamental elements, you gain control over how your subject is perceived.
Identifying and Setting Up the Key Light
The key light is the primary source of illumination in a three-point lighting setup. Its placement and intensity are crucial in defining the subject’s form, texture, and mood. Understanding how to position and adjust the key light will lay a strong foundation for the entire lighting scheme.The key light is typically the brightest light in the setup and is responsible for creating the main shadows on the subject.
Its position dictates the direction of light, which in turn shapes how the audience perceives the subject’s features and the overall atmosphere of the scene.
Key Light Positioning for Optimal Illumination
The placement of the key light significantly influences the perceived dimensionality and mood of the subject. Strategic positioning can highlight specific features or create a more dramatic effect.The ideal position for the key light is often considered to be around 45 degrees to the side of the camera and 45 degrees above the subject’s eye line. This creates a balanced illumination that models the face effectively, revealing its contours without casting harsh, unflattering shadows.
This classic placement is known as “Rembrandt lighting” when it creates a small triangle of light on the shadowed cheek.
Common Key Light Angles and Heights
Varying the angle and height of the key light can dramatically alter the appearance of the subject. Experimentation with these parameters is essential to achieve the desired aesthetic.
- Frontal Lighting: Placing the key light directly in front of the subject, close to the camera axis, results in minimal shadows and a flat appearance. This can be useful for a clean, even look but may lack depth.
- Side Lighting: Positioning the key light at a 90-degree angle to the camera axis creates strong contrasts and emphasizes texture. This can be dramatic but may leave one side of the face in deep shadow.
- Top Lighting: A key light positioned directly overhead can create a dramatic, almost ethereal look, but it can also cast unflattering shadows under the eyes and nose.
- Low Angle Lighting: Placing the key light below the subject can create a spooky or menacing effect, often used in horror films.
Techniques for Controlling Key Light Intensity and Spread
The intensity and spread of the key light can be modified using various tools and techniques to achieve precise control over the illumination. This allows for fine-tuning the mood and detail captured.
- Light Modifiers: Softboxes, umbrellas, and diffusion panels are used to soften the light, making the shadows less harsh and the transition between light and shadow smoother. A larger modifier will produce softer light.
- Distance: Moving the light source closer to the subject increases its intensity and makes the light fall off more rapidly. Moving it further away decreases its intensity and makes the fall off more gradual.
- Flags and Cutters: These opaque materials are used to block or shape the light, preventing it from spilling onto unwanted areas or creating specific shadow patterns.
- Dimmers: If the light fixture has a dimmer control, the output intensity can be directly adjusted.
Visual Impact of Different Key Light Placements on Facial Features
The way the key light falls on a subject’s face has a profound impact on how their features are perceived. Understanding these effects allows for intentional manipulation of the subject’s appearance.
- High Key Light (above eye level): This placement generally creates a more flattering and youthful look, illuminating the eyes and upper face, while casting softer shadows below the cheekbones.
- Split Lighting (approximately 90 degrees from the camera): This technique illuminates exactly half of the face, leaving the other half in shadow. It is a dramatic and often masculine lighting style that can add intensity and mystery.
- Loop Lighting (key light positioned at a 45-degree angle and slightly above eye level, casting a small shadow of the nose that loops down towards the mouth): This is a versatile and flattering lighting pattern that adds dimension without being overly dramatic. It is widely used in portraiture.
- Broad Lighting (key light on the side of the face closest to the camera): This placement illuminates the larger, more visible side of the face, making a narrow face appear wider. It can sometimes appear less natural than short lighting.
- Short Lighting (key light on the side of the face furthest from the camera): This placement illuminates the smaller, less visible side of the face, making a wide face appear narrower. It tends to be more dramatic and can be used to add a sense of mystery or intrigue.
Implementing the Fill Light
The fill light plays a crucial role in a 3-point lighting setup by mitigating the harsh shadows cast by the key light. Its primary function is to add illumination to the shadow side of your subject, thereby controlling the contrast and shaping the overall mood of your image. A well-balanced fill light ensures that details in the shadow areas are visible without overpowering the primary illumination from the key light.The intensity of the fill light is a critical factor in determining the final look of your lighting.
Adjusting its brightness allows you to fine-tune the visibility of shadows. A brighter fill light will reduce shadow depth, creating a softer, more even illumination, while a dimmer fill light will allow shadows to remain more prominent, contributing to a more dramatic or moody aesthetic. The goal is to find a balance that serves your creative vision for the scene.
Adjusting Fill Light Brightness for Desired Shadow Levels
The ratio between the key light and the fill light is the fundamental principle for controlling shadow depth. This ratio is typically expressed in terms of f-stops or light intensity. Understanding and manipulating this ratio is key to achieving specific visual outcomes.
- High Ratio (e.g., 8:1 or higher): This indicates a significantly stronger key light compared to the fill light. Shadows will be deep and pronounced, creating a high-contrast, dramatic look. This is often used for film noir styles or to emphasize a sense of mystery or intensity.
- Medium Ratio (e.g., 4:1 or 2:1): This provides a moderate level of fill, softening shadows without eliminating them entirely. It offers a balanced look, suitable for most portraiture and general studio work, allowing for detail in shadows while maintaining dimensionality.
- Low Ratio (e.g., 1:1 or 1.5:1): In this scenario, the fill light is nearly as bright as, or even brighter than, the key light. This results in very soft, almost nonexistent shadows, creating a flat and even illumination. This is often used for product photography where detail is paramount or for a clean, modern aesthetic.
Fill Light Intensity Relative to Key Light in Various Scenarios
The optimal intensity of the fill light is not a one-size-fits-all solution; it depends heavily on the desired mood and the subject matter. For instance, in a dramatic scene where a single character is contemplating a difficult decision, a low fill light intensity would be employed to maintain deep, expressive shadows that enhance the mood. Conversely, for a cheerful product shot of a shiny new gadget, a higher fill light intensity would be used to ensure all surfaces are well-lit and no distracting shadows obscure important details.
“The fill light should never overpower the key light; its purpose is to complement, not compete.”
Methods for Using Diffusion to Soften Fill Light Output
Diffusion is a technique used to spread and soften the light emitted by a source, making it less harsh and more flattering. For the fill light, diffusion is particularly important to avoid creating a second, competing light source with sharp edges.Methods for diffusion include:
- Softboxes and Umbrellas: These are common lighting modifiers that enclose or reflect light, spreading it over a larger surface area. A softbox, with its reflective interior and diffusion front panel, is excellent for creating a broad, soft light. Umbrellas, either shoot-through or reflective, also provide a wide spread of soft light.
- Diffusion Gels or Scrims: These are translucent materials placed directly in front of the light source. Diffusion gels, often made of acetate or similar materials, come in various strengths to control the degree of diffusion. Scrims, typically made of a fine mesh fabric, can also be used to diffuse light. For fill lights, using a medium or heavy diffusion gel or a larger scrim can significantly soften the light.
- Bouncing Light: Instead of pointing the fill light directly at the subject, you can bounce it off a neutral-colored surface such as a white wall, a reflector card, or a white bounce umbrella. This indirect method naturally diffuses the light, creating a very soft and flattering effect. The further the bounce surface is from the light source, the softer the resulting light will be.
Utilizing the Back Light (Hair Light/Rim Light)
The back light, often referred to as the hair light or rim light, plays a crucial role in defining your subject and adding depth to your image. Its primary function is to create separation between the subject and the background, preventing them from appearing flat or merged. This light sculpts the edges of your subject, giving them a three-dimensional quality that enhances visual appeal.Positioning the back light strategically is key to achieving the desired rim effect.
This light is typically placed behind and slightly above the subject, angled to shine towards the camera. The goal is to catch the edges of the subject’s hair or shoulders, creating a subtle, glowing Artikel. This Artikel helps to lift the subject off the background, making them stand out more prominently.Controlling the intensity of the back light is essential to avoid overexposure and maintain a balanced image.
While it should be noticeable, it should not overpower the key light or create blown-out highlights that lose detail. Adjusting the light’s power output or its distance from the subject allows for precise control.Considerations for using colored gels on the back light open up creative possibilities for mood and atmosphere. Different colors can evoke specific emotions or stylistic choices. For instance, a cool blue gel can add a sense of drama or mystery, while a warm amber gel might create a more inviting or nostalgic feel.
Back Light Purpose: Subject Separation
The back light is instrumental in creating visual separation between your subject and the background. By illuminating the edges of the subject, it establishes a distinct Artikel, preventing them from blending into the backdrop. This technique is particularly effective in studio settings where backgrounds can sometimes be plain or distracting. The contrast generated by the back light makes the subject the undeniable focal point of the photograph or video.
Back Light Positioning for Rim Effect
Achieving a flattering rim effect requires careful placement of the back light. The ideal position is typically behind and slightly to one side of the subject, angled towards the camera. This angle ensures that the light grazes the edges of the subject’s form, such as their hair or shoulders, creating a luminous halo. Experimenting with the height and angle of the light will help you find the sweet spot that accentuates the subject without creating harsh shadows on their face.
Back Light Intensity Control
Managing the intensity of the back light is crucial for maintaining a well-exposed and aesthetically pleasing image. The back light should be the least powerful of the three lights, serving as an accent rather than a primary source. Overly strong backlighting can lead to blown-out highlights, where details are lost and the image appears overexposed in those areas. Adjusting the dimmer on the light fixture or moving it further away from the subject are common methods to control its output.
Creative Effects with Colored Gels on Back Light
The application of colored gels to the back light offers a powerful tool for creative expression and mood setting. By placing a colored gel over the back light, you can cast a subtle tint onto the edges of your subject, which can dramatically alter the overall feel of the image. For example, a warm orange or red gel can add a sense of passion or intensity, while a cool blue or green gel can create a more serene or mysterious ambiance.
These colored rims can also be used to complement the color palette of the background or the subject’s attire, leading to a more cohesive and visually engaging composition.
Equipment and Placement Considerations

To effectively implement a basic 3-point lighting system, having the right equipment and understanding its placement is crucial. This section will guide you through the essential gear and strategic positioning to achieve professional-looking lighting.Having a foundational understanding of the equipment at your disposal allows for more creative and controlled lighting scenarios. The choice of lights and modifiers can significantly impact the mood and quality of your final image or video.
Essential Equipment for a Basic 3-Point Setup
A basic 3-point lighting setup requires a few key pieces of equipment to bring your subject to life. These components work in harmony to sculpt light and create depth.
- Key Light: The primary light source, providing the main illumination for your subject.
- Fill Light: A secondary light source, used to soften shadows created by the key light.
- Back Light (Hair Light/Rim Light): Placed behind the subject, it separates the subject from the background and adds dimension.
- Light Stands: Essential for positioning your lights at the desired height and angle.
- Light Modifiers: Tools that shape and soften the light.
- Power Sources: Batteries or AC adapters to power your lights.
Comparing Light Types for 3-Point Lighting
The type of light you choose can influence the aesthetic and practicality of your setup. Each type offers distinct advantages and disadvantages, making them suitable for different shooting environments and creative goals.
| Light Type | Pros | Cons | Best For |
|---|---|---|---|
| LED | Energy efficient, cool to touch, adjustable color temperature | Initial cost can be higher, color rendering index (CRI) varies | Versatile, continuous shooting |
| Tungsten | Warm, pleasing color, affordable | Generates heat, higher power consumption | Film-like look, controlled environments |
The Importance of Light Modifiers
Light modifiers are indispensable tools for controlling the quality and spread of light. They transform harsh, direct light into something more pleasing and flattering, enhancing the overall visual appeal.
- Softboxes: These enclosed diffusion materials create a large, soft light source, reducing harsh shadows and providing a flattering, even illumination. They are excellent for portraits and general studio work.
- Umbrellas: Available in both shoot-through and reflective versions, umbrellas offer a broad, soft light. Shoot-through umbrellas diffuse light directly, while reflective umbrellas bounce light back onto the subject for a softer effect. They are often more portable and affordable than softboxes.
- Grids: Grids, also known as honeycombs, are attached to light sources to control light spill and create a more focused beam. They are useful for isolating a subject or creating a specific spotlight effect, preventing light from hitting unwanted areas.
Common Lighting Patterns with a 3-Point Setup
A well-positioned 3-point lighting system can create a variety of classic lighting patterns that add depth and character to your subject. These patterns are achieved by adjusting the angle and intensity of the key light relative to the subject and camera.
- Rembrandt Lighting: Characterized by a small triangle of light on the cheek opposite the key light. This is achieved by placing the key light at a roughly 45-degree angle to the subject and slightly above eye level, creating a dramatic and moody effect.
- Butterfly Lighting (Paramount Lighting): This pattern features a butterfly-shaped shadow directly beneath the nose of the subject. It is created by placing the key light directly in front of and above the subject, often used for glamorous or high-fashion looks.
- Split Lighting: With split lighting, one side of the subject’s face is illuminated, while the other side remains in shadow. This is achieved by placing the key light directly to the side of the subject, creating a dramatic and often mysterious feel.
- Loop Lighting: Similar to Rembrandt, but the shadow of the nose forms a slight loop that doesn’t quite connect with the shadow on the cheek. This is achieved by positioning the key light slightly off-axis and lower than for Rembrandt, offering a balanced yet dimensional look.
Practical Application and Adjustment

Having understood the core principles and components of a 3-point lighting system, the next crucial step involves its practical application and the art of fine-tuning. This section will guide you through adapting the setup for various subjects, highlight common pitfalls to sidestep, and offer a structured approach to resolving lighting challenges. We will also illustrate a foundational lighting diagram for a typical headshot.
Adapting 3-Point Lighting for Different Subjects
The versatility of the 3-point lighting system allows it to be adapted for a wide array of subjects, each requiring subtle adjustments to achieve the desired aesthetic. The key is to understand how the intensity, direction, and color temperature of each light interact with the subject’s form and texture.
Portraits
For portraits, the goal is often to create a flattering and engaging image that reveals the subject’s features without harsh shadows.
- Key Light: Positioned at a 45-degree angle to the subject, this light should be the brightest. Its intensity can be adjusted to control the overall mood – higher intensity for a more dramatic look, and lower for a softer feel. For softer shadows, use a larger light source or a diffusion modifier.
- Fill Light: Placed opposite the key light, its role is to soften the shadows created by the key. The intensity of the fill light should be significantly lower than the key light; a common ratio is 2:1 or 4:1 (key to fill). A reflective surface like a white card can also serve as a fill light for a more natural look.
- Back Light: Positioned behind and slightly above the subject, this light separates the subject from the background and adds dimension. It can create a subtle halo effect or a more pronounced rim light, depending on its intensity and diffusion. Adjust its angle to avoid flaring into the camera lens.
Product Photography
Product photography demands precision to showcase the product’s details, textures, and form. The lighting should highlight the product’s best attributes and minimize distracting reflections.
- Key Light: Often positioned to reveal the product’s shape and texture. For shiny objects, the key light should be large and diffused to create pleasing reflections rather than harsh glare. The angle is critical for defining contours.
- Fill Light: Used to control specular highlights and ensure shadow detail is visible. For reflective products, the fill light might be a large, soft source or even a bounce card to gently lift the shadows without washing out the details.
- Back Light: Essential for creating separation from the background, especially for dark or translucent products. It can also be used to highlight edges and contours, giving the product a sense of depth and dimension. For glass or metallic objects, the backlight can be shaped to create interesting highlights.
Common Mistakes to Avoid in 3-Point Lighting Setup
While the 3-point lighting system is fundamental, several common errors can detract from the final image. Being aware of these pitfalls can significantly improve your results.
- Overpowering Fill Light: Using a fill light that is too strong can flatten the image, removing all sense of depth and dimension. The shadows should be present, just softened.
- Incorrect Key Light Angle: Placing the key light too high or too low can create unflattering shadows on the face or object. The 45-degree angle is a good starting point, but experimentation is key.
- Ignoring the Background: A poorly lit background can distract from the subject. Ensure the background is intentionally lit, whether it’s to be dark and moody or bright and airy.
- Harsh Shadows: Not using diffusion on the key light when necessary can result in hard, distracting shadows, particularly in portraits.
- Backlight Flare: Positioning the backlight too close to the camera axis without proper baffling can cause lens flare, reducing contrast and image quality.
- Inconsistent Color Temperature: Mixing lights with different color temperatures (e.g., daylight and tungsten) without correction can lead to unnatural color casts.
Troubleshooting Common Lighting Issues
When your 3-point lighting setup doesn’t produce the desired effect, a systematic troubleshooting approach can help identify and resolve the problem.
- Problem: The subject appears flat, with no depth or dimension.
- Cause: Fill light is too strong, or the key light is too weak.
- Solution: Reduce the intensity of the fill light, or increase the intensity of the key light. Ensure the key light is positioned correctly to create defining shadows.
- Problem: Shadows are too harsh and distracting.
- Cause: The key light source is too small and too close, or it’s not diffused.
- Solution: Use a larger light source, move the light further away, or add diffusion (softbox, umbrella, diffusion gel).
- Problem: The subject is not separating well from the background.
- Cause: Insufficient back light or the background is too similarly lit to the subject.
- Solution: Increase the intensity of the back light, reposition it to create a stronger rim effect, or adjust the lighting on the background itself.
- Problem: Unwanted reflections or glare on shiny surfaces.
- Cause: The angle and intensity of the key and fill lights are creating direct reflections.
- Solution: Adjust the angle of the lights. Use larger, softer light sources and diffusion. Consider using polarizing filters on your lens and lights.
- Problem: The overall image looks too dark or too bright.
- Cause: Incorrect overall exposure or incorrect light intensity ratios.
- Solution: Check your camera’s exposure settings. Adjust the relative intensities of the key, fill, and back lights to achieve the desired overall brightness and contrast.
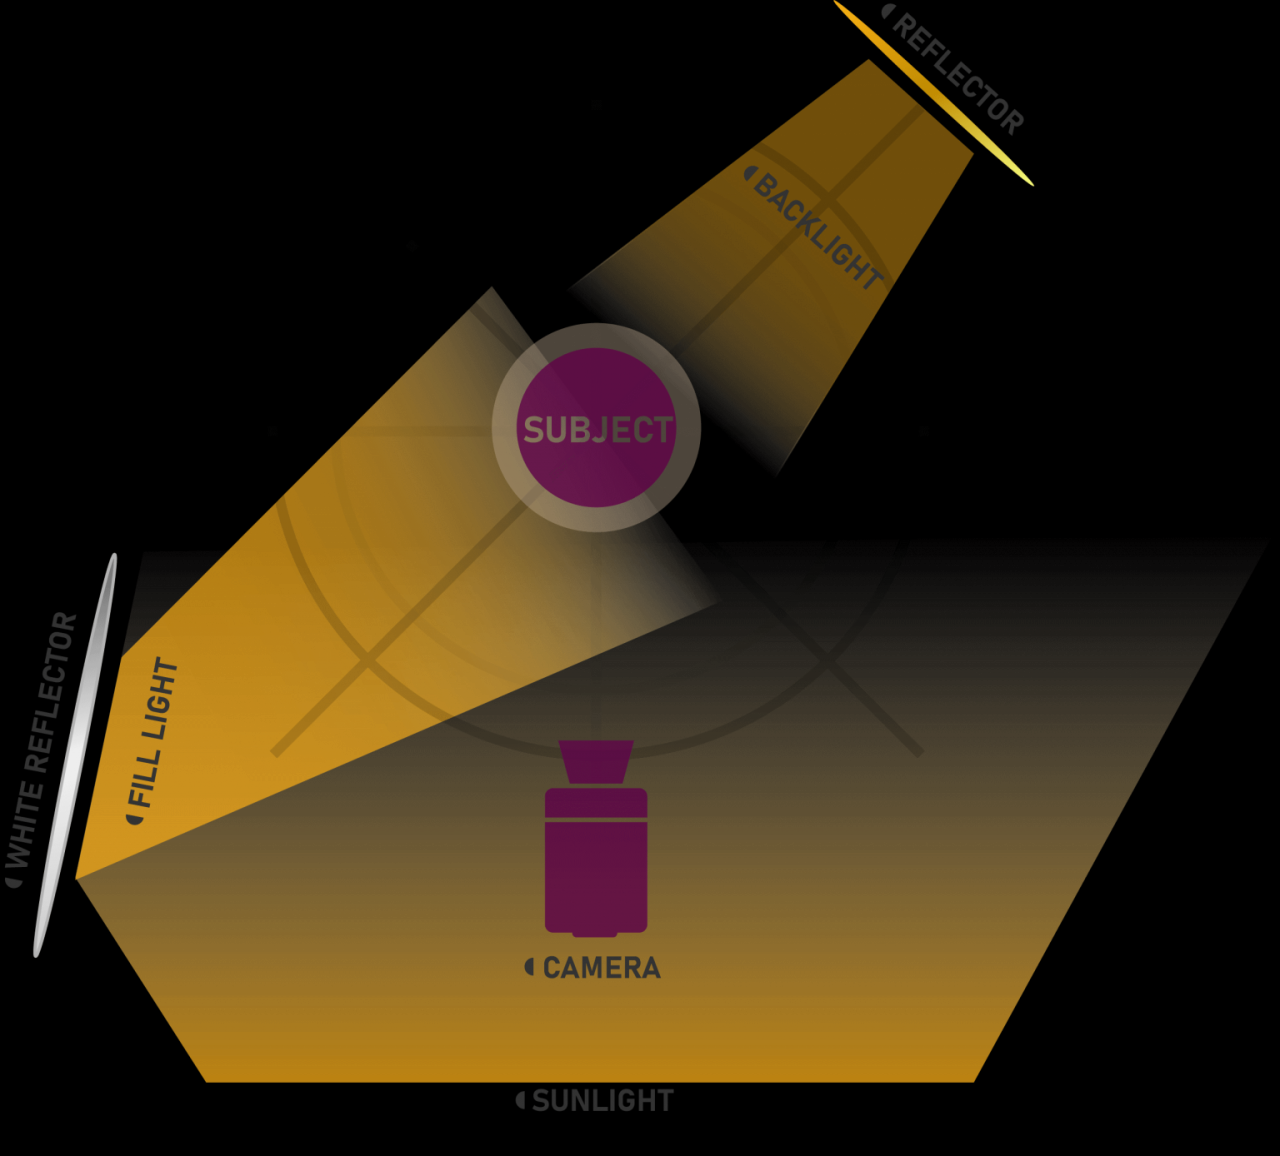
Basic Lighting Diagram for a Standard Headshot
This diagram illustrates a common and effective 3-point lighting setup for a standard headshot, focusing on creating a flattering and professional look.
| Camera Position | ||||
| Facing the subject | ||||
| Key Light | Position: 45 degrees to the side of the subject, slightly above eye level. | Subject | ||
| Effect: Primary light source, creates dominant shadows. | ||||
| Fill Light | Position: Opposite the key light, at a lower intensity. | |||
| Effect: Softens shadows created by the key light. | ||||
| Back Light | Position: Behind and slightly above the subject, aimed downwards. | |||
| Effect: Separates subject from background, creates rim light. | ||||
In this diagram, the camera is positioned directly in front of the subject. The key light is placed to one side at approximately a 45-degree angle and slightly above eye level, illuminating the majority of the subject’s face. Opposite the key light, the fill light is positioned to soften the shadows cast by the key light, with its intensity set lower than the key light.
The back light is positioned behind the subject, typically at a higher angle, to create separation from the background and a subtle highlight around the edges of the hair and shoulders, defining the subject’s form.
Last Word
By understanding the core principles and practical applications of a 3-point lighting system, you are now equipped to create stunning visuals that captivate your audience. From defining the subject with the key light to softening shadows with the fill and adding separation with the back light, each element plays a crucial role. Experimenting with different light ratios, modifiers, and placements will unlock your creative potential, ensuring your subjects are always beautifully illuminated and your productions achieve a polished, professional look.